|
Make Your Own Bicycle Panniers
Make, Create, Build, Design Your Own Custom Bicycle/Bike Bags and Panniers in a Variety of Ways. Sewing and or Non Sewing Projects, Some Duct Tape Projects, for Adults and Children. Bicycle Panniers in both Hard and Soft Sided Information and Instructions with Photos. Idea, Information, Pattern How To's, Step by Step Instructions, Photos Included, for how to make/craft/build/diy, do it yourself/handcraft your own Pannier ~ Scroll Down ~ I have information below on how to make your own Saddle Bags, one piece two Panniers, as well as Individual Panniers made using Feed Bags~GO GREEN, I have How To's for creating Bicycle Bags for Children using Stuffed Toys, as well as Kid Sized Handle Bar/Handlebar Bags, as they say <more photos coming soon>.
The difference between Bicycle Saddle Bags and Bicycle Panniers is that Saddle Bags are all one piece with two Panniers sewed to a yoke. And although Panniers, pronounced PAN-i-eers, are the bags that hold the stuff you carry, most people call Individual Panniers, just Panniers...because that is what they are. Saddle Bags have been around and used for centuries behind the saddles of equine (horses, mules, donkeys...) It is the old "Necessity is the Mother of All Inventions".
Since people have been riding bikes they have been using carriers attached to them to carry items, like Groceries. Years ago, we had the cutest little girl neighbor who had the cutest little natural colored basket with ribbon and bow on the front of her little bike. In the basket she had a little pillow for her little dog named "Schnops". The dog would get out and get in on command and off they would ride. Very cute.
People have used everything from a Plastic Bag to a Cardboard Box, to expensive fancy, Panniers made by Companies that make all sorts of Bike Accessories. You do not have to spend a lot of money to have nice cargo areas to carry your stuff as you ride your bicycle. There are some GREAT ideas for Baskets, or Panniers out there that are FREE to Cheap to make yourself.
Make sure you do not overload your bike, or your own ability to peddle the weight. Be sure to carry an extra bike intertube, carrying a lot of weight on the back tire can put more pressure on the rear wheel. Uneven loads (on each side of the bike) can cause "wobble" when riding.
If you do use two different types of Panniers, both on the front or back of your bike, make sure they weigh the same. Keep in mind the air will hit them differently so you might notice that your handlebars are not straight as you ride. For long rides and or continued use of non matching Panniers, this can wear your tires unevenly.
If you will be carrying food inside your Panniers, be SURE to use Human Food Grade Containers that you will be using to make your Panniers out of. Yes. It matters. Even if you are panning to wrap your foods well inside the Panniers, food grade material only.
6-13-2014 MAKING CUSTOM PANNIERS FOR MY BICYCLE
INSTRUCTIONS FOR MAKING YOUR OWN BICYCLE PANNIERS Materials:
Obviously you need a sewing machine, scissors, thread, measuring tapes and the like.
Nice Water Resistant, thicker, like Cordora or Nylon Fabric, or other fabrics you might find ~ How much should you buy? Depends on the size or your Panniers. Measure your bike, figure out how much you need, then go shopping for your favorite colors, or colors to match your bike....buy a bit more than you think you might need. It is better to have a little extra than not enough.
Webbing for the Handle and or if you want to use it under your velcro where you will attach the Panniers to the Bicycle ~ Webbing can also be sewn unto the outside of your Panniers for an area to tie items down unto.
Webbing and 4 Side Release Buckles for Compression Straps. These will make your trip better and easier when you compress the bags down on long rides. You will need enough webbing to round the entire bag, full sized, and a little extra for sewing on one end and attaching the other end of your buckles.
Velcro ~ At least 2', I use a lot, I also use velcre for the inside pockets I add to the Panniers
Zippers x 2 ~ Size will depend on the size you are making the Panniers ~ BUY NICE ZIPPERS, I like the type that has two pulls so the Panniers can be opened from either size and easily
Patience, Yes. The Panniers are a several hour project. For some the project will take the day or two days. It does not matter....that is, if you do not wait til the last minute before your big ride to make these. Have fun with the sewing project. Don't get stressed over the project, think of how nice it is you are saving all this money making your own Panniers in the colors and sizes you want them in.
WARNING: Don't wait to make these Panniers until the day or night before your Big Ride. You will need to try these, loaded, on short rides to make sure they will work for you and for your Bicycle
Also:
****Panniers need to be loaded evenly, weight wise that is.
****Be sure to take short rides with your new Panniers before you head out on a Multi-Day or Long Rides. That way you will have time to decide on any adjustments you might want to make.
****Be sure to double, I triple or more, every seam on your Pannier set. This way the seams are stronger and will not only hold better, but will last years longer without repairs
****For Fun I cut a Stuffed Dog out of the same fabric (a turquoise nylon) and only stuffed the head and tail. On the stomach, I put a zipper and used the Stuffed Dog as a Bag that sat on top of my Panniers on the Rear Rack. This also makes a great pillow. This time, for my 29" Wheeled bike, I bought a stuffed German Shepherd Dog and cut the stomach area to take the stuffing out. I added Velcro for closing the belly as well as more velcro for attaching to the handle of the Pannier Set, and I will do the same, use it for a bag on top of the Panniers on the Rear Rack for fun.
Hints:
**I learned many years ago that your Panniers do not have to be perfect. No one will see your little errors, once it is loaded and going down the trail.
**When you finish your Panniers, set them somewhere and walk away for a day or two. THEN come back and look at them. All those little mistakes that at first stand out to you, will disappear after a few days and you will be very proud of the Project you finished.
**If you are sewing and get frustrated, walk away and go look at the prices (on line) of the high end Panniers for Bicycles. Then take a deep breath and go back to the sewing machine.
**Seriously. Take your time. The old "Measure Twice, Cut Once" applies to this project too.

TO KEEP IN MIND:
***Remember, if you are in the Sewing Area Sewing your Bicycle Panniers, you are NOT in the Kitchen Eating or sitting on the Couch Snacking.....this is a Win Win Project!
MAKING YOUR PANNIERS FOR YOUR BICYCLE INSTRUCTIONS OR CALL IT INFORMATION: I have made these several times for different sized bikes. Many times it is better to just buy nice Panniers for your Bicycle, but they can be QUIET pricey! The reason I make the ones I use and have made them for other folks. Sorry. I am not offering to make yours. <smiles> But here is how I make, or call it "hand craft" the ones I sew for Touring or Bike Camping.
First you need a Rear Rack for your bike. You need this before making your Panniers or even making the Pattern for them. You will need the measurements from the Bicycle after the Rea Rack is mounted onto the Bike as you will be using it. Yes. This step matters and it matters much.
Take a Tape Measure and Measure your bike from one side of the Center of the Wheel, where the Frame comes together at the wheel that is. Measure either from the top of your Rear Rack and multiply that times two, and add the width of your Rear Rack for the size of your full/under side of your Panniers. OR: Measure from one side of the Center of the Wheel, up over the Rear Rack and back down to the other side where the Center of the Wheel is on the far side. This should give you the same measurement for your bottom side of your Pannier.
Have a piece of paper and pen so you can write down all the measurements as you measure them. Make notes, draw a picture, make sure you know WHAT measurements you are writing down.
Measure your Center of the Wheel on one side of the Bicycle up to the Rear Rack. This will be the size of the Pannier. Now measure the Rear Rack from the seat of your bike back, not including the seat, just the Rear Rack (I mentioned the seat to give you an area to start). This measurement will be the width of your Panniers.
Remember the old "Measure Twice, Cut Once", use that idea for this project.
You can cut your fabric straight or slant back a bit on the front or front and back sides. I have made them both ways. With my 29" Wheel Bike, I slanted the fabric back on the front side. On other bikes, I have not, I left them squared out.
Decide how wide you want your Panniers to be. Cut fabric for your Yoke in all one piece, not in three pieces.
Cut your Top Piece or Lid or Closing Top a bit larger than your Yoke size so that your zippers are covered with a flap.
id= align=right
USE THE INSIDE LINER OF A PAPER FEED BAG OR A PAPER SHOPPING BAG AND CUT A PATTERN, CHECK TO MAKE SURE THAT THIS ALL FITS YOUR BIKE CORRECTLY. BY CUTTING THIS PATTERN, YOU WILL ALSO BE CHECKING ALL YOUR MEASUREMENTS WITH PAPER, RATHER THAN CUTTING YOUR FABRIC POSSIBLY WRONG. I use the inside liner of feed bags for many types of patterns, make the pattern of what it is nd keep it for future use.
To Sew:
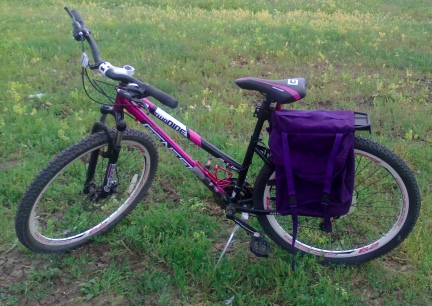
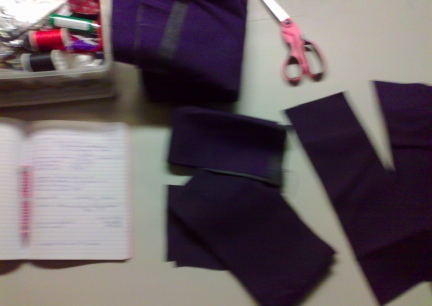
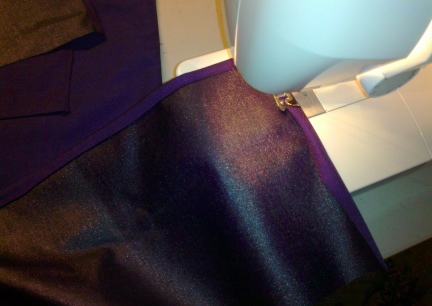
****I always double the fabric of my Back Piece. That is the long piece the Panniers will be sewed to. I have and have not, doubled the fabric for the rest of the Panniers Set. This time, using a very nice weight Purple Cordora, I did not double any piece other than the Back, or full piece, that rides next to the bicycle.
****With right sides together, pin and sew your back piece together, leaving an area open for turning right side out, and turn inside right. Using your hands and a pencil in the corners, push the fabric out and flat at all the seams.
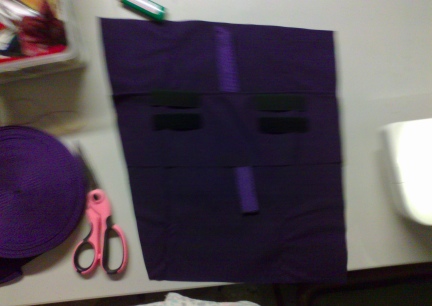
****Sew all of your pockets unto the pannier pieces. Decide if you want your pockets on the side of your Panniers next to the bike, or the outside. It is easier to sew your pockets to the flat piece of fabric rather than into the inside of your Panniers. If you are adding Velcor to close your pockets, sew the velcro piece to your Pannier Piece first. Then after sewing the flaps down on the pocket pieces, sew the velcro on it it. Press the velcro pieces together, pin the edges and sew your pocket pieces down to your Panniers. Be creative, sew all the pockets in your Panniers to match what your are carrying. Hide one at the very bottom for cash. Have fun with deciding on your pockets.
****If you are adding Webbing, for tying unto, on or to the outside of your Panniers, sew the webbing on before you sew your Panniers together to the Yoke.
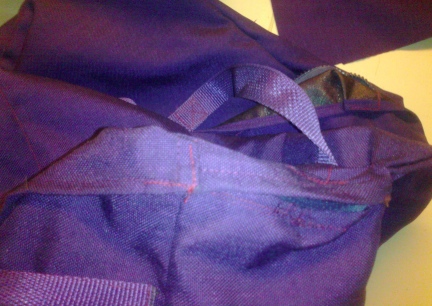
****I sew on my Handle before the Panniers are sewn on. I use the box stitch at both ends. A box stitch is a sewn box shape with an X inside the box. I triple my stitches for strength.
****Sew your Yoke (the width pieces of your Panniers) to the outside Pannier Piece first.
****Sew three sides of your Top Closure Piece or "lid" of your Pannier, turn the fabric under to make a nice looking seam.
****Lay your outside Pannier piece on top of your back side, add your Top Closure Gusset or "lid" of your Pannier. Pin where you want them, make sure you pin the side that will flap down over the Pannier. Pin and check the action before sewing.
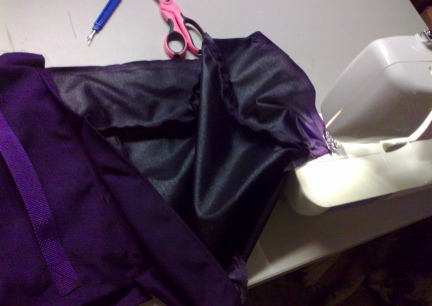
****When sewing your Pannier unto your back piece, sew with the outside facing the back side, look at what your are doing a few times before sewing. You do not sew the front to the back as you would think. Pin it and turn the pocket so that you can make sure you have this right when you turn the Panniers finished.
****When your Panniers are sewn together take them out to your bike and set them on the Rear Rack. With a marker, make a mark on the fabric on the back side next to the bike where your velcro strips should go unto the Panniers to hold them to the bicycle. Measure the circumference of your bars then add about 2" for your Velcro length for tying on. You don't want too short of velcro toughing, or doubled over, to hold your Panniers to your bike. You want a nice tight, well held grip.
****Sew your Zippers in last. After all else is finished.
****I sew the tucks of the Top or Lid by hand. I put the zipper in and then at each corner above the top half of the zipper, I turn the lid pieces under to create a fold over the zipper and sew these by hand. By making these adjustments it will hold the top/lid in place on your ride. This will keep rain and or dust out of your Pannier that could be seeping in otherwise.
6-14-2014 I WAS LAYING IN BED LAST NIGHT AND I REMEMBERED.... On the 13th I had to put the project away and move things around, a bad storm was moving in and they were telling folks, on the TV, to get to the safe spot in our homes. We have a tiny house, so it takes some moving of everything for us to get to ours.
I did not get the project back out, but while I was laying in bed and falling asleep I remembered, while not thinking about it, that I had forgotten to add my Compression Straps to the outside of my Panniers. These are almost a must. They not only hold the load tight, they keep the load from moving about in your Panniers while you are moving as well as takes up the slack as you use up items such as food from out of your Pouches on each side. (remember to even out your load again as you use items from out of each side of your Panniers).
I got my project out again, the sewing machine and all and set it up. I cut my webbing to fit the Panniers, with a bit extra inches for the buckles and started putting this all together. Straps like these need to be boxed squared when sewn on and with all the doubling and tripling and more I had been doing for this project, and with only one spool of thread this color....
While I was making my Panniers, I ran out of thread. Dang It! I NEVER run out of threads, I sew for a living, I ALWAYS have at least two spools of thread of all colors. So I put it all away until after the next trip to town.
6-16-2014 ~ It has been a while since I have made Panniers, either for Bicycles or Animals. Boy, have the cost of GOOD Zippers gone up. But worth the money for sure. Nothing would be worse to put all the money and time into a project like this one and have cheap zippers break out on the trail. Thread had gone up about $1 per spool too. Again. Do not scrimp on this sort of project!
6-27-2014 Finally Finished!
This morning I finally took the time to finish my Bicycle Panniers!
I still had to sew one of the Panniers to the Yoke. I Zig Zagged stitched around all the edges, this keeps the seams from fraying later on.
I then added the zippers in each side of the Panniers.
When finished with the zippers, I tucked and hand sewed the top of the panniers.
Then the last thing is to mark the Panniers as they sit on the bicycle, so that the velcro closures correctly line up for attaching the Panniers to the Bicycle as your head down the trail.
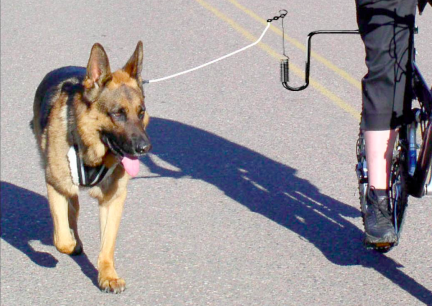
EVER HEAR OF A BICYCLE SPRINGER DOG ATTACHMENT?
DON'T LEAVE ROVER AT HOME! Dogs LOVE to Run and They Love To Go With Us....Ever Heard Of A Bicycle Springer Attachment?
Bicycle Springers are attachments you can attach to your Bike, the arm or long dog spring, comes off and on depending on when you want to use it. Your dog needs to be trained, but the Spring on the Springer keeps the dog from pulling you over and is far safer than just having a leash on your dog as your ride your bike. Have a look at our "Bicycle Springer ~ Dog Attachment" page here on this site, check at the right in the Navigation Box, near the bottom for more, detailed information.
NEVER add a Backpack to your dog's back while it is hooked to a bicycle, or any other vehicle, the dog IS ALREADY WORKING to keep up. How would you like your friends or family to put a Backpack on your back and then hook you to the vehicle as they drove?????
INDIVIDUAL BICYCLE PANNIERS MADE FROM FEED BAGS
I LOVE reusing Animal Feed Bags. The type they make today are waterproof and large as well as brightly decorated. I will, However, be using plain white Corn Bags. I use these for many things including carrying our dirty laundry to the Laundromat and wet clothes home to hang them. The Corn Bags are waterproof, have a bit, just a little bit of air flow, and hold up for yeeeeears of use.
I made the food bag above and got the Idea that making a set of Panniers out of these would work out great and last for many years to come.
Materials Needed:
I am going to use 4 Poly Woven Corn Bags, I am doubling each side for thicker, more durable Panniers. But if you wanted to, you could just use 2 Corn Bags, or 2 - 4 of another type of Poly Woven empty, clean Animal Food Bags.
Matching or Contrasting Poly or Nylon Webbing <I recommend Poly, easier to sew, lighter weight, holds very well.> How much? That will depend on the size of your feed bags and how you want to put your Compression Straps onto your bags and if you are going to add handles or not.
4 Side Release Buckles
A few feet of Velcro Closure
About 24" of either Bias Tape or Parachute cord to Match your Webbing....or not, this is for making loops, think belt loops, on your Pannier for your Compression Straps to stay in place.
A good attitude and good humor!
Feed Bag Preparation:
The first thing you want to do is turn your Feed Bags inside, make sure to push out each corner all the way out, and shake them ~ do this outdoors. Wash your Feed Bags, still inside out, in cold pr warm water with a load of towels. Hang the Feed Bags to dry for about 24 hours....still inside out.
Sewing:
I am going to set one Feed Bag inside another, that is, double my Feed Bags for longer life. The Corn Bags are not as tightly woven as other Feed Bags.
For my doubled feed bags I will first sew each of the two sets together at the top opening.
Then with the bags still outsides in, sew about a 6" seam at the bottom corners, sideways. Another words, make the bottoms like a Tote Bag. This gives you a gusset without sewing a gusset into the Panniers. Double, Triple sew these seams, all seams, but these will be holding the most stress of the Pannier. DO NOT SEW OVER THE SAME SEAM, MOVE YOUR SEAM OVER JUST A BIT, JUST A LITTLE, CAN'T EVEN REALLY NOTICE IT BIT, or you will be perforating the Feed Bag and these seams will actually tear the bags right there.
Now turn your Pannier inside right.
IF you want to have handles at the top, so you can easily carry your Panniers when they are not on your bike, this is the time to add them to your Feed Bags. The size and angle is up to the user. I like big handles so that if I have on gloves or other items in my hands at the same time, the handles are easy to use. Handles will fold over to the outside of your Panniers when on your bicycle and should be tucked up under the velcro fold over closure so they are not "blowing in the wind" as you ride your bike.
Sew a piece of Velcro to each side of the inside opening, this in lieu of a Zipper, you certainly could use zippers. Now sew a couple of 6" pieces of velcro closure to the outside of one side of the top of your Pannier. This will be the Folding Hold Down.
Hint: This side will be away, or on the outside of your bicycle. Use your HARD SIDES of velcro at the top of your Pannier for the fold over.
Decide how far down you want to fold your Panniers over. You might want to add two SOFT SIDES fold down areas later so that on the trail you can choose how far over to fold your Panniers.
Sew your Soft Sides to the Pannier at those measurements you have chosen.
A person could sew their Compression Straps on a number of ways, here is how I am doing mine on the Feed Bag Panniers. I am cutting my Parachute Cord at about 1 1/2" strips. This way the 1" Webbing will flow through them easily and quickly. If you have thicker webbing, cut your pieces longer.
I measure my Compression Straps by actually wrapping them around the Pannier itself. Then I cut about 4 extra inches, 6 is not too many.
Sew the female side of the Side Release Buckle on to one end of the strap.
Now take that side, the one with the female side of the buckle sewed on and hold that onto your Pannier with the buckle over the top, and the rest running down with the feed bag. Now look at it sitting on the table like that. Place your buckle where you want it to be sewn to your Pannier for use on the trail. Sew it down on the BACK side of the Pannier.
Hint: I like my Compression Straps about 4" - 6" in from the sides, but don't forget about your bottom seams making your Pannier have a gusset.
Now lining your Compression Strap up with the Pannier as you want it to lay, pin or make a small dot where you want each of those, loops, like belt loops, sewn unto your Pannier. Be sure to really nail these loops down, they could be holding a lot of pressure. But remember too, that you do not want to perforate your Pannier, sew the loops with seams moving over just a bit each time.
When in use, tie your extra webbing from your compression straps (after compressed with smaller load) and either loop or tie them down so that they hare not waving in the wind as you ride your bicycle down the trail.
Take this now Pannier out to your Bicycle with a marker and hold it up on your Rear or Front Rack to decide where you want the velcro holders to be place. Sew them on and take it back out to your bike to make sure they fit correctly. If you are pleased, take the Panniers back to the sewing machine and really sew that velcro onto the Panniers. I use a box stitch, it is a sewn box with an X in stitches x3. This is the same as I sew my Dog and Goat Harnesses that pull a LOT of weight.
I added two approx. 2" strips to the top area just below where the velcro is for hanging in trees while out camping with my bicycle. Handles at the top of the Panniers can also be used for tying out/up. This way the food and other items are out of the reach of most, if not all, animals that might want to eat my breakfast while I am sleeping. I will also make a bell knot to add to the bags. Not so much to scare the animals away, although that would be great, but to alert me to the animals messing with the Pannier.
To Clean: You can use a damp cloth to wash these Panniers off, or close all the snaps and buckles and wash in the Washing Machine on Cold or Warm with a load of Towels. Hang To Dry!
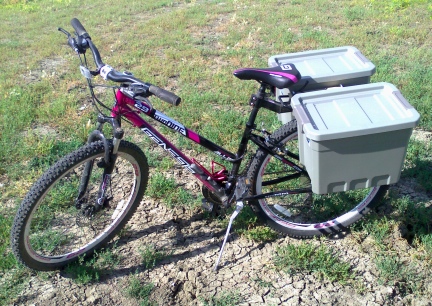
MAKING (DIY) HARD SIDED PANNIERS FOR BICYCLES
It is not Rocket Science and you do not have to put these together just like someone else does. There are MANY different types of Instructions and Information for turning Kitty Litter, Laundry Detergent, Pet Food, or even Round Buckets into Panniers for the Rear as well as the Front Wheel of your Bicycle. I have even seen one guy, via the Internet, that just uses a Bicycle Tube and Side Release Buckles to attach his buckets to his bicycle.
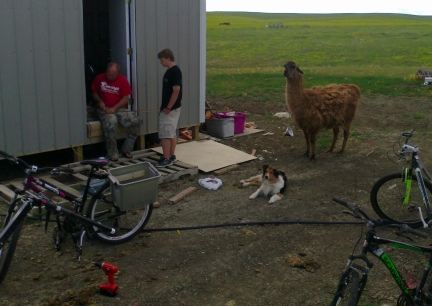
I bought these "locking" top/lid Storage Tubs at a Discount Store for less than $7 each. They are deep and have a lot of storage room in them. They work very well for my 29" Wheel Genesis Bicycle.
PLEASE NOTE IN THE PHOTOS ALL THE WORK DERON HAS FOR EACH JOB HE EVER DOES AROUND HERE...WE LOVE OUR ANIMALS!
You are going to need:
Before you are able to ride a bicycle off onto the trails carrying all the items you have stuffed into a bucket or hard sided container attached to your bicycle, you need a Bicycle in Good Repair.
On your bicycle, you will need what is called a Rack. They make them for both the Rear and Front Wheels.
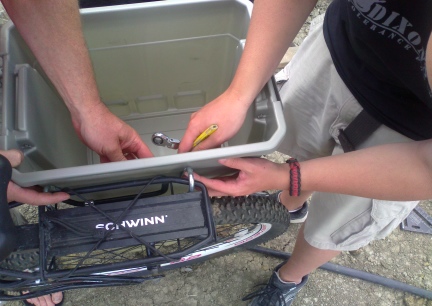
You will need, I recommend two matching, containers of some sort. Many people use Kitty Litter or Cat Food Buckets. These work very well and the tops shut pretty tight. If you do not own a cat, or use this type of products, look around, you might have something else that will work, or want to buy different items for the buckets. I bought the two "storage tubs" with lock down lids/tops at the big Discount Store for less than $7 each. They are a bit larger than the large sized Kitty Litter Containers with the half flip up top/lid many people use for bicycle Panniers. Just remember, you need Food Approved containers if you are going to carry food within.
As I said above, you could just use a Tire Tube and Side Release Buckles, to attach the buckets to your bicycle.
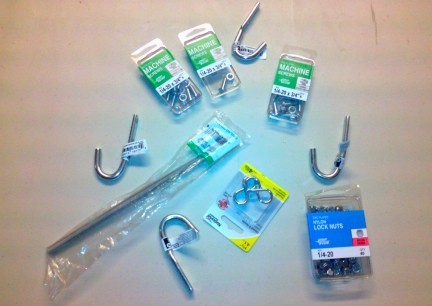
We are going to add Hooks and Springs for our project.
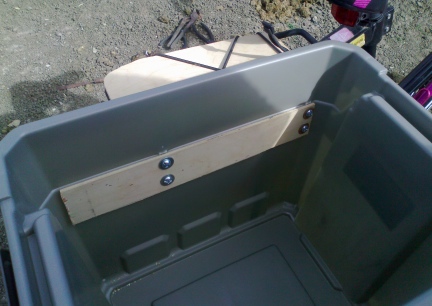
Reflectors of some sort. You could buy the type that bolt on, or use Reflective Tape. If you use Reflective Tape, use a good amount. If you buy Reflectors that bolt on, get large ones. To attach all these items you will need Bolts, Nuts and Washers. We decided to use a Thin Plywood to stiffen and Protect the area the Bolts were going into, you do not need much for this project.
There are many types of materials a person could use for a padding or liner inside the buckets where your bolts will attach. We are using thin Plywood Why do you need a padding or liner? The padding gives each side Pannier more strength, not only to hold a heavier load up and away from your wheels, but it also will keep the bolts from working the plastic til it breaks or dissipates and the bolts fall out as you are riding your bike on the trails. Washers alone will not keep the load from being pressured on the sides of the washers breaking the plastic as you ride your bike.
You will also need some sort of Marker that will put a mark on the plastic of the container and stay there. We used a Permanent Marker in a color we could see, but would not be so obvious if it were seen. You will also need a Pencil to make your wood before cutting it. Sand Paper will come in handy for sanding your wood before adding it into the inside of the Pannier.
Most people will use a Piece of Paper and a Pen to make notes and write down sizes to cut items before cutting. You might want it there to make notes on or write down other items or forgotten items for this same project.
After surveying the project for my 29" Wheel Bicycle, Deron also used two pieces of Band Metal, ours from Shelving Brackets.
I bought all the items in the photo in one isle in a Hardware Store. I had asked THREE employees about the hooks, describing them as well as I could, you would not believe the items they showed me. Look over by the Eye Bolts for these, at least that is where I found them. Also, all of these items are very inexpensive.
Tools Needed:
You will need a Drill
Drill Bits the size of the Bolts you choose to use
Pliers
Screw Drivers with the type of heads needed for the type bolts you bought for the project
If you use metal and are cutting and sanding it, you will need a Jigsaw with the metal Blade. Use a Metal File to sand the edges.
A Jigsaw or other Saw to cut your wood, and Sand Paper to soften the edges.
You might want to wear Leather Gloves, I do to protect my Finger Nails, plus, I seem to get scratched, cut or poked when I work with tools and metal materials.
Preparing Your Panniers:
If you use Kitty Litter or Laundry Buckets you might want to take off those labels...and it might not be easy. Some Fingernail Polish Remover, or Paint Removers might work, use gloves and work on this outdoors. This can take time, you will need patience. For this part of the job, it might be all you do in a day to prepare your buckets. And it will look nicer for years to come.
When you are all finished and ready to attach your New Hard Sided Panniers to your Bicycle, Wash the inside of the buckets with warm water and soap, rinse really well. Turn them upside down and let them air dry to they are completely dry.
Add your Racks to your Bicycle.
Check Fit. Have someone hold the Panniers RIGHT WHERE THEY WILL SIT ON YOUR RACK while you get on and move your peddles backwards (spinning free) to make sure that your heals will not hit the buckets as you peddle. You might need to make a few adjustments with your Racks or to the buckets where they sit on the Racks.
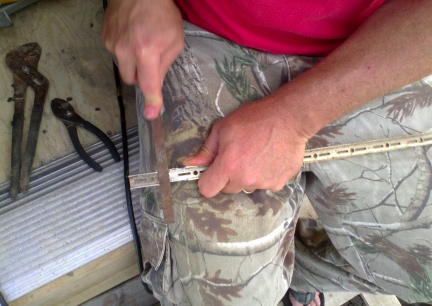
Measuring and Drilling:
Always remember, MEASURE TWICE, CUT/DRILL ONCE! This really is important. Once your drill your buckets, they have a hole there. If it is off a bit, it may not work at all. These buckets, in my opinion, are not inexpensive, if you do not normally buy these items for your pet cats, and very frustrating, if mistakes are made AFTER you spent and hour or two getting all the labels off. Seriously, do not get in a hurry to make these. Take your time so that they look nice and are useful for many years to come.
Take some time and look around the Internet at all the different ways these Panniers can be made, decide how you want YOUR Panniers made.
Start Making Marks On Your Panniers... After you have set up your Rear Rack on your Bicycle, and you have taken your buckets out to the Bicycle and had someone hold the panniers where you think you want them to set on your racks, with your feet on the peddles move the cracks so that you will know if your heals are going to hit the buckets as you peddle. If you are hitting the buckets in your foot rotation when peddling, move the buckets back a ways on the rack and peddle again. When you have the buckets where they need to be, take a Marker and mark the spot.
Measure and Mark the area you want to add your inside the bucket wood to your buckets. Mark your bucket with the Marker, your Wood with a Pencil. Always check and double check before marking and especially cutting your pieces.
As I said before, above, there are many ways that these Panniers can be set up on bicycles. You just need to figure out what will work well, fit and be sturdy enough to hold items while on the trail, for YOUR Bicycle.
I have said more than once, and several times about projects like this, on this page, "measure twice, but once". The bottom line on that statement, not mine, just one I have heard many times through the years, is that you do not cut or drill until you are sure of what you want your finished project to be, to look like, to function like. When I asked Deron, my husband to build these type of Panniers for my bicycle I had one way of doing this in mind. When Deron started measuring and with my 29" Wheels, he wanted to do it another to make it safe for riding and study for holding the items I will be carrying.
My point is: Make sure that everything in this project will work for YOU and YOUR bicycle before you start. Have someone hold the Panniers in place, hold your bicycle while you are on it "air peddling", to make sure you have foot clearance while peddling. Make sure the Buckets YOU use not only fit your bike, but do so safely. Do all this BEFORE YOU START THE ACTUAL PROJECT, BEFORE CUTTING, BEFORE DRILLING. Otherwise, you might end up with items that will not work for you and a lot of time and money wasted.
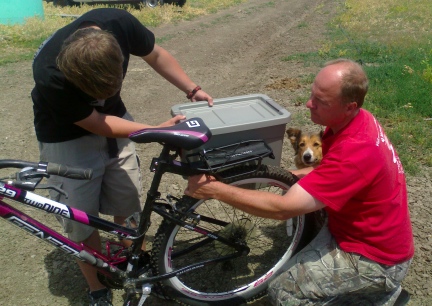
Deron's Ideas That Worked Well For Us Deron looked over the project a while before having me come out and sit on the bicycle. Deron had his son hole the front end of the bike so I had balance, as Deron held the Pannier in place and the back wheel up so I could peddle. Most of the time, I was "free peddling", that is, backwards so that we could check fit without the bike moving or Deron having to hold the bike up.
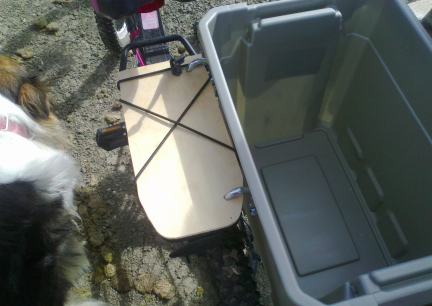
After looking it all over, Deron decided to cut and add another metal bar from the Bike Rack down to hold the Panniers from hitting or banging or swinging into the spokes of my wheels. He measured, but and filed each side out of metal shelving pieces.
Deron did not just add wood to the inside of the Panniers, but also to the top of the Rear Rack so that the Hooks on the Panniers do not move around at all. The more stable the better.
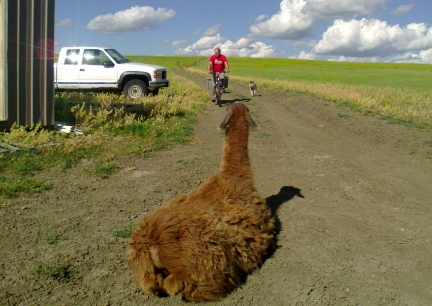
After the first ride with the Panniers on my bike, riding the Mickelson Trail in Deadwood South Dakota, I added Reflective Tape Strips to the back, orange, and to the side and front, white. I am not planning on riding at night, but you never know. Plus when I use the Panniers for overnighters, I want them, if left out, to be seen by any vehicles pulling our way, near our tent.
Be sure when you drill your holes in your wood and plastic sides they line up correctly. Use strong and the shortest that will work out for your set up, bolts. I recommend washers.
The bottom hole, the one that Deron set up for clipping/bolting into the metal shelving strip, also needs to be reinforced and bolted with a washer. The bolt we first put in was too short, but the next, we used a Wing Nut on the outside so that it will stay bolted on the trail. The Wing Nut will be easy to put on and take the Panniers off when they need to come off the bike.
The photos pretty much tell the story. I can not add measurements because bike sizes and the type of buckets you use for your project will change them. Have fun making these Panniers and more than that! HAVE FUN OUT ON THE TRAIL AND BE SAFE!
MAKING BICYCLE PANNIERS USING SOFT SIDED INSULATED COOLERS
Making Bicycle Panniers out of Soft Sided Coolers should be easy and work well. You can then use the Coolers for not only ice and food and or drinks, kept clean, you can pack all of your other camping items into them just as you would any other Panniers.
Depending on the size of Cooler you are using, most will just need Velcro for attaching to the Rear Rack either up as one Bike Bag or two for Panniers. Attach these as you would one single Pannier as finish with instructions above for just that.
MAKING BICYCLE PANNIERS USING HARD SIDED INSULATED COOLERS
You would not want very large Hard Sided Coolers for several reasons. One: the weight on the bike. Two: These will have to set back away from your peddling area making a large cooler setting way back over the rear tire. This will not only make you "back heavy" and be hard on your tires, it is going to be hard to peddle uphill.
So using smaller Hard Sided Coolers, make a frame for the Coolers to set into, a frame that will attach to your Rear Rack. The frame could be made out of wood or metal. Just make sure you make your frame Heavy Duty so that it can handle the load and the bumps and hills on the trails.
ATTACHING BASKETS TO YOUR BICYCLE
coming when I find nice baskets to use as well as the materials needed to attach to a bike
How you attach Baskets to your Bicycle will depend on the size of the Basket as well as how much weight you will be carrying inside of them as you ride. If you will be carrying Camping Gear or a Small Dog, you will want to attach the Baskets as you would if you were attaching the Kitty Litter Buckets using all the hardware needed. If you will only be carrying light loads, such as items you buy from a Flea Market or Outdoor Market, you might only need Zip Ties to attach a Basket to your Bicycle.
If you use Zip Ties, be sure to go around a good portion of the weaving of the Basket, not just a strand or two. Also, use several Zip Ties so that the Basket is not only attached soiledly, but also will withhold all that you put into it as you ride your bike. Keep in mind that if you use Zip Ties, you can not carry a heavy load or small dog within.
MAKING A CHILD'S HANDLEBAR BAG
Kids like to carry things on their bicycles too. When our sons were young I must have made a dozen or more of these for their bicycles. I have also made these for my son's friends. I picked fabrics that they would like and measured off their own bikes for each one. We used to take them out for lunch on the trail when they were little and let them carry food, water and a flashlight and such. Create Memories. These take a short time to construct and the kids LOVE them.
You Will Need:
Enough Fabric for the size pouch you are making. Measure the bike and do the math. For Cotton Prints, I doubled the Fabrics. You could also put the Cotton Print over a nice water resistant fabric.
Velcro. Velcro enough to make three straps, two on the top for over the handlebar and one for attaching to the handlebar stem. I also used velcro rather than a zipper for the closure on the kid's Handlebar Bags.
Making Your Pattern:
Take a Measuring Tape out to the Child's Bike and measure the size you want the Bag to become. I usually did a 3" Yoke, you do not want the Yoke to thick/wide it will sag the bag and encourage the child to carry to much in the bag when it is on the bike.
I made the front of the bag, facing out, with a flap over the side of the bag for closure. It is backwards for most Cyclists, but great for a chile and easy to construct. So the back side of your bag measurements will have the Flap Over (think woman's purse) too.
Sit down with a piece of paper and pencil and figure the sizes and how much fabric you will need. It does not take much. Many I made used about 1/4 to 1/3 of a yard of fabric.
I cut these Bike Bags from four pieces of fabric, two really, doubled. I sew the two sides, front and or back pieces, to one another, front sides together leaving the side of the bags open for turning, so that there are no frayed edges when in use.
You might add a Yoke. I do not. Kids do not need to carry too much and the thinner it is the less likely to be too heavy.
Cut the Back Side so that it has a Flap that folds over the front side and close the Bag with Velcro, I use a pretty good sized piece so that items do not fall out the sides.
still working on this area
patterns and idea as well as information coming soon
MAKING REAR PANNIERS FOR A CHILD'S BICYCLE
Make these the same as you would for an adult sized bicycle. Use the same rules to get your measurements for sizing. Make sure that the child's feet/heals do not hit the bottom of the Panniers as they ride.
Same loading rules apply, keep the Panniers equal in weight and above all, do NOT over load the child.
DIY DOG TREAT BOX PANNIERS
These are some what "green" and a great project to do with your children. Let the kids do as much of the work on these as they can. Let them feel like they made a great item and you will not only encourage them to create, but to be proud of their work. Couple that with you children wanting to get out and ride their bikes with these attached, and you will be quite the Proud Parent of a Young Cyclist!
Take a Dog Treat Box, emptied and cleaned, and a roll or your favorite Duct Tape and line the inside and out with tape that overlaps. Carefully punch holes where they need to be for attaching to your bicycle. Use Zip Ties, with a little slack for tying onto your bicycle. Use Velcro or more zip ties to attach to your Rear Rack.
USING A STUFFED TOY TO MAKE A REAR RACK BIKE BAG OR A HANDLEBAR (handle bar) BAG
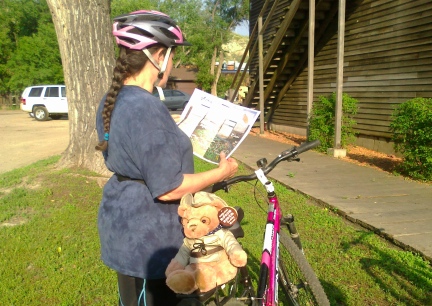
You can use an old or new Stuffed Toy for this project and kids can help. I would recommend trying this project with a used, buy one at a Thrift Store for less than $1, to work out any kinks you might have with the project.
You will need a Rear Rack on the Bike that this Bag will ride on. And a Stuffed Toy that is the right size for the bike, not too big, not too small, no legs that hang low enough to get caught in spokes.
An animal laying down is usually best, but even a stuffed doll can be used. Use a bungie to keep the legs up on the Rear Rack. Keep it Safe above all.
Cut open, on the seam, of the belly, or largest area of the stuffed toy. Remove all the stuffing from that area, leaving the stuffing inside the head and legs. You can cover the stuffed area with a small piece of fabric or not. I usually do not.
Sew Velcro or a zipper back into the area that was used for the seam you just split open.
Sew velcro to the Stuffed Animal where it will be attached to the back of the bicycle and attach the stuffed animal.
I have also make stuffed animals in colors to match the Panniers I have made for bicycles. You can find patterns on the Internet for FREE or buy them in Fabric Stores. Just make sure you are making the right/safe size animal bags.
STUFFED ANIMAL FRONT HANDLE BAR BAG I made this Handlebar Bag using a Teddy Bear I found for .25 at a Thrift Shop.
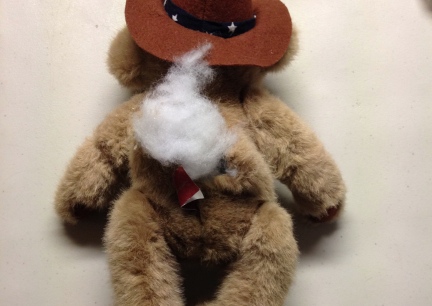 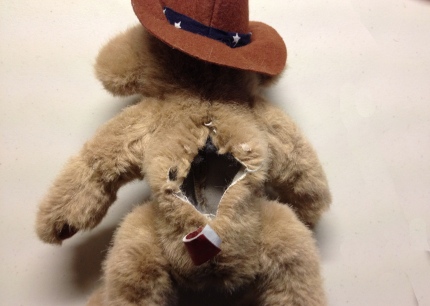
As above, I cut the back seam open. I pulled out the stuffing.
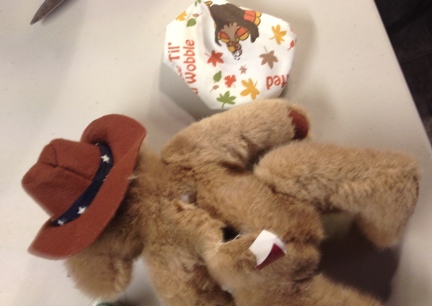 
With a small piece of fabric I made a little pouch by sewing the fabric in the rear only. I left one side open so that it would become the pouch for the items. I measured the bear's belly, where I had cut it open and took the stuffing out, top to bottom, then side to side. I cut a rectangle, then rounded out the fabric.
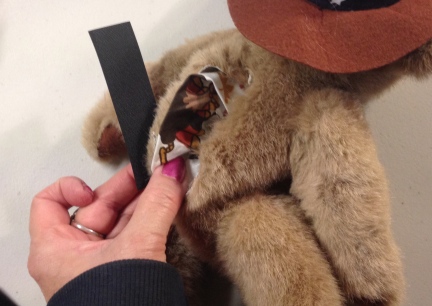
Next I pushed the pouch into the bears body. I cut a piece of Velcor the size of the open cut, for the closure. And lined it all up and used pens before sewing it all together. (hint: it was not easy and some of the sewing I did by hand).
Take your Teddy Bear to your Bicycle and measure the animal to see if the Bear's arms are long enough to reach around the handlebars and down over the stem. If not, add paracord or webbing to the snaps before sewing it all down.
Next sew Snaps to each foot of the bear so that it attaches over the bar of your bicycle and stabilize the Bear as the child rides the bicycle.
SNACK/CHIP BAG BICYCLE BAGS
To Clean: Wash the Snack Bag inside and out with warm soapy water. Air Dry upside down.
To Make: Take two empty and washed Snack Bags and line them with Fabric. Make an appropriate sizes pouch to fit inside your Snack Bags. Glue in with Craft Glue, good for Fabrics. Use Press On Velcro for closures and Sew On Velcro for attachments that are well glued onto the clean bags.
Or: Use the same idea with clean and dry Snack Bags as above, but instead of using fabric on the inside, use Clear thick Packing Tape on the outside. Glue velcro closure, sew on type, for the attachments.
These will not hold heavy items well, but what fun on one of the City Organized Bike Rides, just for fun!
PLEASE NOTE THAT WE HAVE A PAGE HERE AT THIS SITE FOR 'UPCYCLE A BICYCLE TRAILER'
Upcycle, Re Make (remake), DIY, Trash Backwards, ReUse, whatever you call it. Take an older Bicycle Trailer and custom design a Bicycle Trailer to fit your Touring and Camping Needs. Find ideas by clicking the button at the right in the Navigation Box for the page here at this website.
The contents of this page for Make Your Own Bicycle Panniers is still/might remain under construction. Please check back later and see what we may have added.
-- The Far Out Living Team
Wed, 02 Jul 2014 11:47:25 -0400
| 


 In the high plains of South Dakota, USA