|
UpCycle A Bicycle Trailer
Upcycle, up-cycle, DIY, Do It Your Self, Make, Hand Craft, Home Made, Trash Backwards, Recycle, Re-Cycle, Save From the Landfill, Land Fill, Reuse, Re Use, what ever you call it, it is all the same, making something out of and item or items you already own....I learned to do this because I did not have the money to buy new, long before it was KOOOOL to do! Back in the 1960 - 1990's we just called it converting, or we converted or just convert something into something else. Or we said things like Trash to Treasures. Or Trash to Junkque, or the like. Solomon said all those years ago, "...there is nothing new under the sun.." These days, people put new words to things, but it is all the same.
Did your kids outgrow their Bicycle Trailer and now as a family you would like to do a little Bicycle Touring or Bike Camping? Why not UpCycle That Kids Trailer and use it to carry your camping gear? If you do not own a Child's Trailer, buy one used for a song and make it the way YOU want it for the items you are going to be towing behind your bicycle.
I brought home two bicycle trailers years ago, I am not even sure if I bought them at a Garage Sale or Thrift Store or found them in the Trash Bin it has been so long ago. I brought them home to make Dog Wagons out of. Now though, we are riding our bikes again. We are hoping to do a bit of Bike Camping out on the Mickelson Trail. We need a Bicycle Trailer.
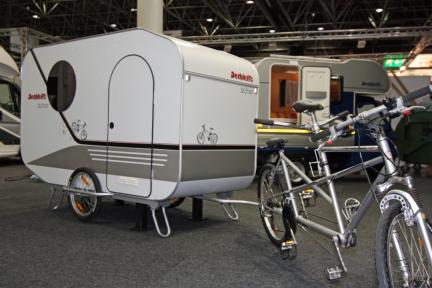
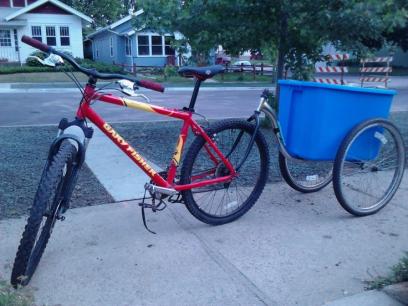
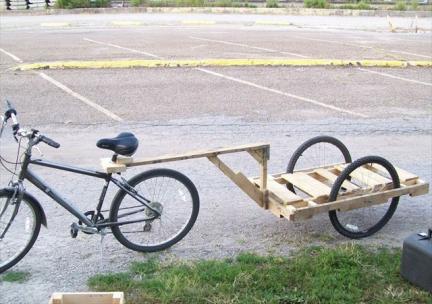
The great thing about UpCycling or Building Your Own Platform for your own Bike Trailer is that you can customize it for your needs. I have seen many Up-Cycled or Home Made Bike Trailers that are as simple as a platform with added Storage Tubs bungeed down to them. We like that idea. This type of trailer can be used in different ways for different trips on different trails.
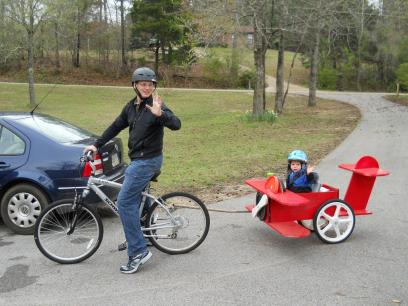
We have also seen many people out on the trail pulling their belongings needed behind their bicycles inside the Child's Trailers as was. Just set the items right in where the kids used to sit and ride. Items stay dry and are easy to access from this set up. We also see dogs and other pets riding in Kids Trailers, but there are, on the Market, Pet Trailers for bikes too. ie: You might also be able to find a used Pet Trailer to Up Cycle and Customize your own Camping Trailer too.
Have your priced Bicycle Trailers new? How handy are you?
MAKING YOUR OWN DIY CUSTOM BICYCLE TRAILER
Here is some information and ideas for you to think about making your own Bicycle Camping Trailer. If you Up-Cycle or Trash Backwards, you will have all the expensive parts just waiting to be used for another, newer, Bicycle Trailer.
HINTS:
**You do not have to use a new Trailer for this project
**Many times you will be able to buy items for half their price at Garage Sales and or Thrift Stores, if you just ask. If you don't need the kids area, and the trailer you are looking at is a bit tore up, you don't have to tell the folks you want to take that part off anyway....just start negotiating. Tell them you will have to "do a lot of work on it" before you can use it. You might even find a Kids Trailer that is ready to go, and use it just like that.
**Make sure the Bicycle Hook Up had all the pieces, or you can replace them, and that the Bicycle Hook Up is in working order before buying.
**Make sure the Trailer is still stable, or that you can fix what ever is not.
**Tires and Tubes are inexpensive to replace. Wheels, not so much. Odd sizes, hard to find.
**A little rust will not even slow you down on the trail. Rusted Out, now that is another story.
**Burly Trailers just cost more than other brands, new and/or used. Are they better? They were the first.
**Many Pawn Stores also have Kid's Trailers now and again. In fact, I even saw an expensive Bug Out Bike BOB at a Pawn Store in Rapid City, SD. To me? It was just a nice name brand bike painted tan. But funny to see it there. Never know what you might find there.
**Bamboo is light weight and very strong wood.
**Your Custom Trailer does not have to be FANCY, just safe and FUNCTIONAL.
BEFORE YOU START YOUR PROJECT:
**Before you do anything else, if you can at all (if the used trailer your are buying or have bought is able) hook it to your bicycle and ride around just a bit.
**Decide just how you want YOUR CUSTOM trailer to be, decide what it will be carrying, that is, approx. how much weight. Decide the materials you will be using for the project before you start.
**Get a piece of paper and pencil and start taking/making notes on sizes and ideas.
**Sleep on your ideas, don't get in a big hurry to put this project together.
**If you have the ideas of metal bars and panels, do you have the tools and equipment needed to make this? Paying someone to weld can get very expensive.
TOOLS AND MATERIALS
**Before starting cutting or drilling or too much planning, make sure you have all the tools and materials needed for the entire project.
**Check to see if you have the correct sized Drill Bits before gathering everything else....seems to be a problem around here (ours are used often and wear out or break quick)
**Need Help with the Project? One of your "tools" might be another person to hold items or cut items for you.
Once you start your project, be careful and take your time. File and or sand edges. But above all, be sure to measure twice and cut or drill once. Because if you cut or drill incorrectly, it is done, no going back. Make sure that cut or hole is exactly where you wanted it to be.
more ideas and information coming
coming soon, the photos and ideas we used to UpCycle Our Bicycle Trailer for Camping and or Touring.
DON'T ADD A CHILD JUST YET! So you built this Upcycled Bicycle Trailer and you can not wait to try/use it.
PLEASE do not set a child or pet into an untried Trailer!
Take the Trailer out empty for the first test drive, take it at least around the block. Then throw some other weight, such as camping gear, sandbags, a 40 pound bag of dog food, something other than a live being. Be Safe! Try out your Trailer around the neighborhood, stopping, stopping fast, turning both right and left, back it up, do all the things you would if you were sitting in a car you were test driving...before adding a live being.
After all has been tested, by all means, let the kids or your pet(s) have a ride.
THE BEST LAID PLANS...
Before you start working on the Trailer that you have to make it into the Custom Trailer you want it to be, you need to have an idea of how you are going to change it, what parts will need fixing or changing, how you will attach it to your bicycle...
Deron had those ideas, then bought the new tubes and tires for the Trailer, but them on. The plan was to take it out for a ride around the Prairie on the morning of July 24th 2014...just the frame. We have not yet bought the thin plywood for the flooring. We live 50 miles from a tiny town <read very expensive hardware stores> and about 100 miles from, what Deron and I call a small town, Rapid City, where there is at least a couple of National Chains where we can get the supplies...anyway.
Deron thought he had the connector all figured out...finding out that he would have to take the one trailer (we have two much alike) and the other connector. But when he tried it on his bicycle, with the 29" Wheel....well, back to the drawing board. It seems he will be bending conduit and making a different connector himself. Praise God, Deron is able to do all these sorts of things and do them well and safe.
STORY IN PHOTOS!
This is how we took an old beat up, child's Bicycle Trailer with a hard seat and recycled it into a Touring Bicycle Trailer for carrying our camping and other gear behind our bikes.
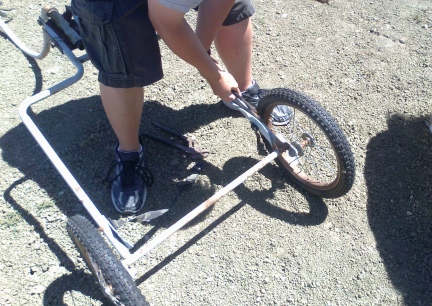
The first thing that had to be done was to take the old, hard plastic child's seat off the Trailer's frame.
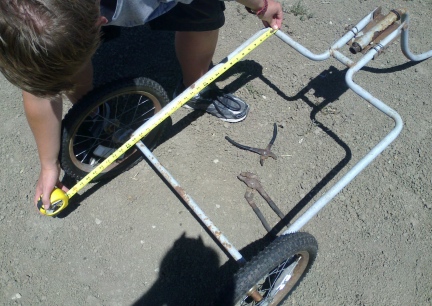
Measuring the Bicycle Trailer to be turned into a Bicycle Trailer for Touring.
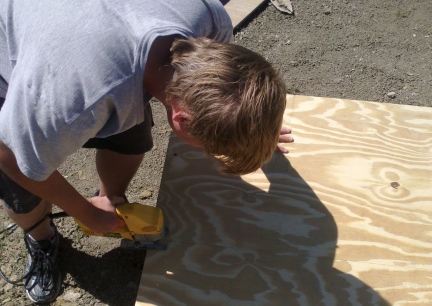
Cutting the board for the platform to hold the Plastic Storage Tub that will hold Camping Gear being pulled behind the bicycles.
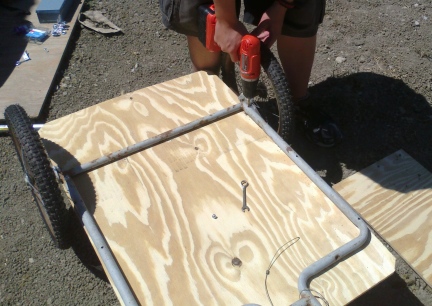
The board had to be drilled, as did the Trailer Frame, so that they can be bolted together.
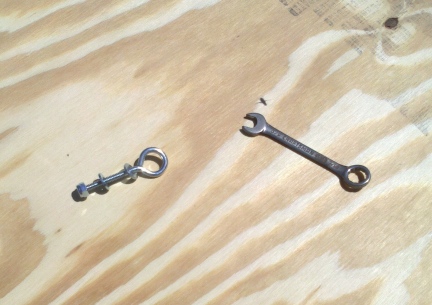
We used eye bolts so that on the top side the O in the bolts can be used for tying down the loads.
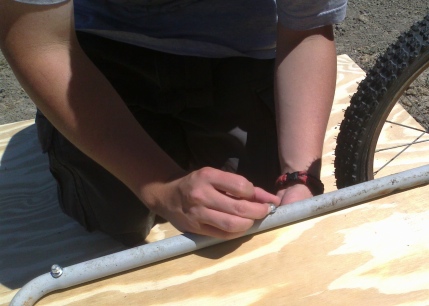
Each bolt needed to be tightened down just right so that it will hold well for the miles, and hold the load down onto the Trailer.
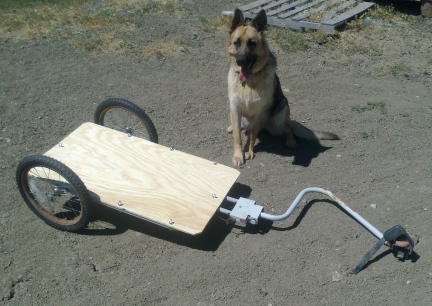
Flipped back over and ready to go. You would have thought Tekoa, our GSD Pup, was the one to build the Trailer. (yeah, her on leg is kinda funny in the photo, trust me, she is a lovely dog with lovely legs)
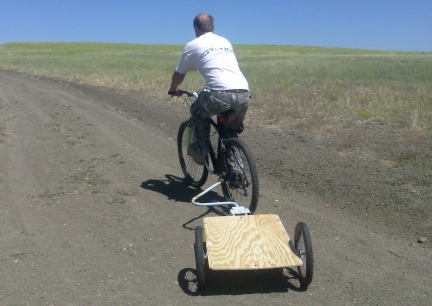
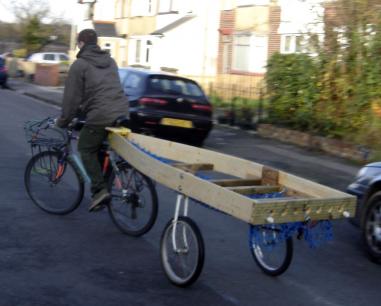
I took this photo a little to early, I should have let the Bicycle Trailer to straighten out behind the bicycle. But here it is, Upgraded and ready to go!
IDEAS OF WAYS YOU CAN UPCYCLE YOUR OWN BICYCLE TRAILER
If you have a Trailer that you Built or Up-Cycled and would like to see it's photo here, send it to me at marna@faroutliving.com we would love to show it off for you!
The contents of this page for UpCycle A Bicycle Trailer is still under construction. Please check back later!
-- The Far Out Living Team
Thu, 10 Jul 2014 11:10:11 -0400
| 


 In the high plains of South Dakota, USA